As an Amazon Associate I earn from qualifying purchases.
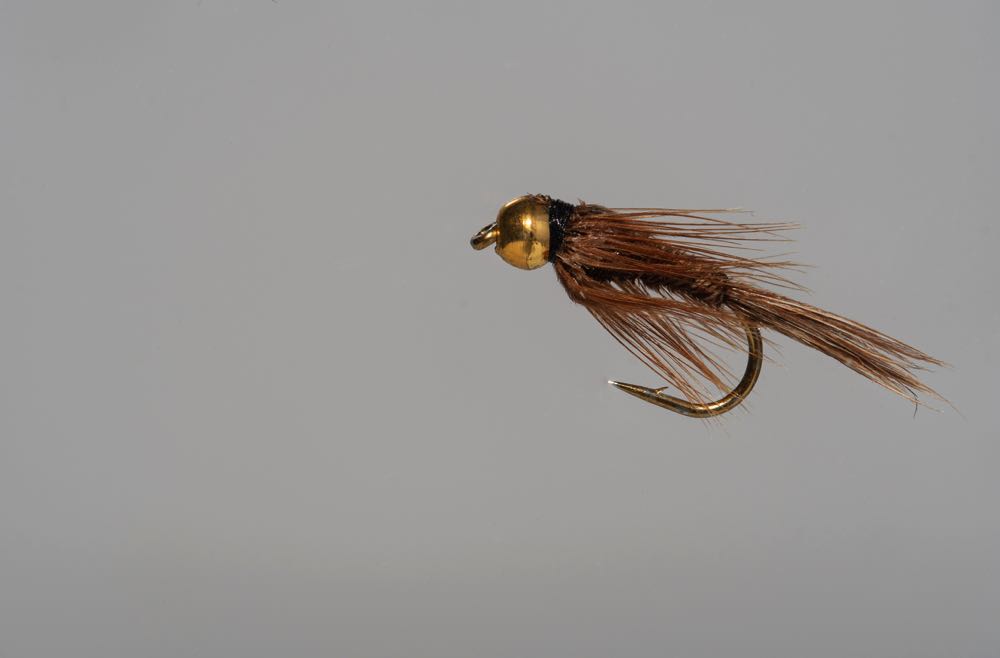
A Pheasant Tail Nymph (commonly referred to as a PTN) is a simple to tie fly. Regardless of your skill level as a fly tier, it’s also a fly that you will keep tying for years. Its simplicity, flexibility, and, mostly, its effectiveness makes it so popular.
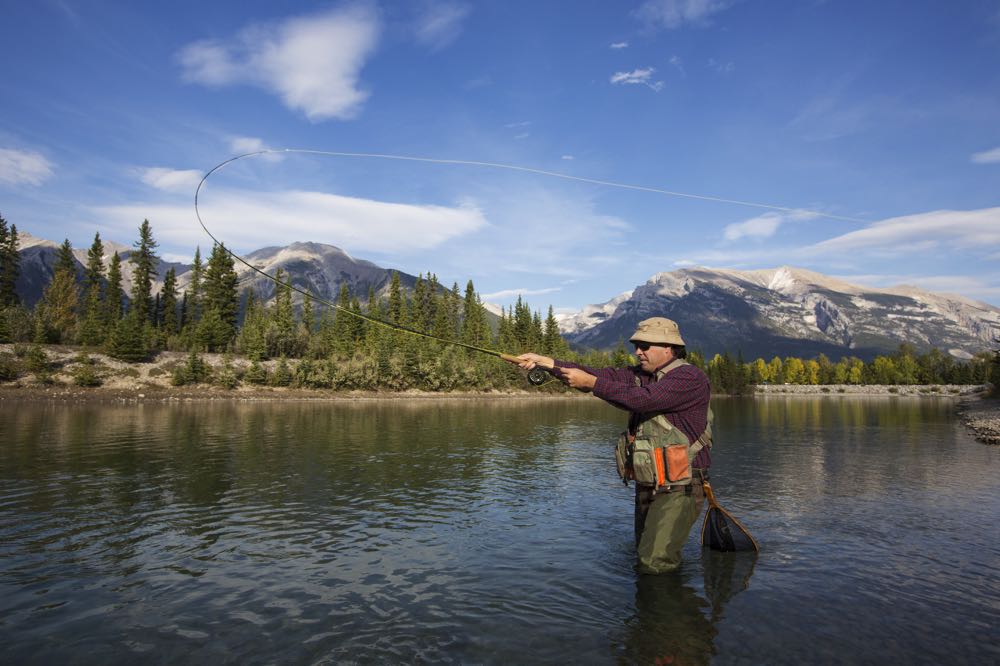
I’ve been fishing for trout and our local South African species, the Smallmouth Yellowfish, for about 15 years. In the fly box I use to target these fish you will always find multiple rows of PTN variants.

Frank Sawyer developed the fly for the chalk streams of Southern England in the early 1900s. It was first published in Frank’s book, Nymphs and Trout, in 1958. Ever since then, it has been a staple trout nymph pattern.
Quick Look
- Difficulty Level: Easy
- Tying Time: 5 minutes
- Materials: Nymph hook, fine flat thread, cock pheasant center tail, ribbing material, dubbing, and an optional bead
- Hook Size: 12 – 18
What is a Pheasant Tail Nymph?
A PTN is an easy-to-tie generic mayfly nymph imitation. That means, it replicates the larva life cycle of a mayfly insect. In many rivers and streams, this food source is in abundance. Trout may even feed selectively on mayfly nymphs.
Depending on the river you fish and the species of mayfly it holds, I recommend having at least 3 sizes in your fly box. For larger rivers 12 – 16. On smaller streams, like my local rivers near Cape Town, I carry PTNs from size 14 to 20.
For each size of PTN, have an unweighted and weighted version. I exclusively make use of tungsten beads on my weighted flies. This allows the flies to sink rapidly.
Also, carry at least 3 flies in your box of each weight and size variant. This will come in handy when you accidentally snap one off on a fish or that damn branch on your backcast. So in total, you’ll have at least 18 individual flies.
Fishing Techniques
Pheasant Tail Nymphs catch fish in rivers and lakes. However, I find them especially effective in rivers. To ensure its success in a river, a drag-free drift is required. These are the methods I make use of:
Combination of Nymphs
In smaller or slower moving rivers, I make use of a combination of 2 nymphs. On the dropper, I’ll tie in the heavier PTN. This acts as an anchor and will also fish deeper than the other fly. Above the dropper I’ll make use of a lighter PTN.
This combo is cast upstream, above the area where you are wanting to fish. The idea is that the flies should be in the feeding zone once it reaches your target area. Ensure that the flies flow in a natural manner.
Dry and Dropper
This is the technique I use about 80% of the time. For the dropper fly choose an unweighted or weighted PTN (depending on where in the water column the fish are feeding). The dry fly is tied in about 2 feet above the dropper on a tag.
Using this method, you are in essence presenting to fish that are either looking upward for a surface meal or are picking small nymphs deeper in the water.
When a fish misses the dry fly on the first take, present the dry dropper rig to him again, and very often he’ll eat the nymph.
Materials You’ll Need to Tie a Pheasant Tail Nymph
In general, the material you need to tie a Pheasant Tail Nymph include the following:
Hook
Most nymph hooks will work for this fly. Ensure that they have a nice wide gape and that the wire is of good quality.

When tying a weighted version, you can also tie this fly on a jig hook. For this you will need to make use of a slotted bead.
Recommended Hooks:
→ XFISHMAN Assorted Fly Tying Hooks #10-16
Thread
Thread choice is a very personal thing. For the PTN, make use of a thin diameter thread. This will reduce bulk when tying really small sizes. Match the color of the thread to that of the fly. I mainly use black, brown, or white on my PTNs.
Recommended Thread:
→ Danville’s Flymaster Plus 140 Denier Thread
Tail
The amount of pheasant tail fibers chosen should suit the fly size. On a size 12, I make use of about 6 fibers. On very small flies (size 18 and 20), I only use two fibers that are split.
Recommended Pheasant Tails:
→ 20-22″ Assorted Hgshow 10pc Assorted Natural Pheasant Tails
Abdomen
The abdomen should be kept as slim as possible. One large flies make use of 4 to 5 pheasant tail fibers. On small flies 3 is perfect. The abdomen forms about 2/3rd of the total body length.

Although the original PTN makes use of natural colored pheasant tails, you can also make use of other colors. These usually include black, red, olive, and yellow.
Recommended Colored Pheasant Tails:
→ 14-16″ Celine lin 10PCS Natural Pheasant Feathers
Ribbing
The ribbing serves two purposes. Firstly, by wrapping the ribbing in the opposite direction than that of the body, you secure the fragile pheasant tail fibers. This helps with the durability of the fly. Secondly, it creates segmentation that resembles the natural.
Recommended Ribbing Wire:
→ Phecda 10pcs Assorted Colors 0.3MM Copper Wire
Thorax
The thorax on traditional PTNs is made of peacock herl. This is still one of my favorite materials to use. Another popular material is a brightly colored dubbing, such as fluorescent orange or pink.

An effective addition to the thorax is to tie in a couple of CDC (Cul De Canard) fibers. This resembles a wing that’s developing in the wing case. CDC also traps micro air bubbles, giving a very lifelike appearance to the fly.
Recommended Dubbing Material:
→ Hareline Ice Dub – Dispenser W/ 12 Popular Colors
Wing Case
The wing case is made by folding over about 6 fibers of pheasant tail. You can also use other materials such as flash (for the very popular Flashback Nymph) or just leave it out altogether.
Recommended Flash Material:
→ Phecda Sport 10 Pack Colorful Fly Tying Flash
Weight
Weight can be applied in various ways. An effective way to add slight weight to the fly is with a couple turns of lead wire. You can do this before the thread is secured on the fly. This can be used to bulk up the thorax area.

The most popular way is by making use of brass or tungsten beads. Tungsten beads seem to offer more color and weight choices. By making use of a fluorescent tungsten bead, you have added weight and a hotspot to the fly.
Recommended Fly Tying Beads:
→ Tigofly 24 Colors Fly Tying Beads
Tools Needed
Below are the tools you’ll need to tie this fly. Keep in mind that you can often make fly tying tools with things you have lying around the house and you can also use natural sunlight instead of a UV light.
- Standard Fly Tying Bobbin-Holder
- Tan Color 8/0 Wax Thread
- Scissors
- Velcro Brush
- Whip Finishing Tool
- UV Glue
- UV Light
Want to purchase pretty much all of the fly tying tools and materials you’ll need to tie this fly and many other popular patterns? Check out this Complete Fly Tying Kit on Amazon, which has almost everything that someone new to fly tying could need.
Watch The How To Tie a Pheasant Tail Nymph Video

Let’s Get Started!
How To Tie a Pheasant Tail Nymph
This guide will go through every step in detail to tie a Pheasant Tail Nymph. You can watch the video above, or you can choose to scroll down and read each step in this tutorial complete with pictures to help you every step of the way while you’re tying the fly at your work bench.
Standard Pheasant Tail Nymph Recipe
• Hook: Nymph Size 12
• Thread: 8/0 waxed thread tan
• Tail: 6 Cock pheasant center tail fibers
• Body: 3-5 Cock pheasant center tail fibers
• Ribbing: Fine copper or gold wire
• Thorax: Black dubbing (I’m using Hemingway’s Hare’s Dubbing Plus UV)
• Wing case: 6 Cock pheasant center tail fibers
Step 1: Place The Hook in The Vise
After selecting the suitable hook, take it between your thumb and forefinger. Place it between the jaws of the vice. If you are happy with the position, lock it in place by activating the cam of the vice.
If you are adding weight to the fly in the form of a bead, you need to insert the bead before placing the hook into the vice.

Step 2: Lay a Thread Foundation
If you want a weighted fly, you can start by wrapping a short piece of lead wire around the hook shank.
Otherwise, wrap thread around the hook shank a couple of times. Run the thread over itself and lock it in place. Cut off the tag end, then advance the thread to just behind the eye of the hook and, with touching turns, create a thread foundation stopping at the bend of the hook.

Step 3: Tie in The Pheasant Fiber Tail
On a PTN I like keeping the tail relatively short. Depending on the hook you use, this can be from ½ to ¾ the length of the hook shank.
After selecting and measuring the fibers, tie them in with pinch wraps where you left the thread at the start of the hook’s bend. Cut off the excess and tidy up the left-over material with thread.

Step 4: Tie in The Ribbing Wire
Run the thread to about 1/3 behind the eye of the hook. Tie the ribbing in and secure it with thread up to the base of the tail. While running the thread backward, manipulate the ribbing’s position to be on the side of the hook shank the entire time as you wrap thread around it to secure it.

Step 5: Create The Abdomen
Cut off the desired amount of pheasant tail fibers and tie them in at the tip (the thinnest part). This will ensure that, as you wind the fibers forward, you create a tapered body.
Cut off the excess fibers and move your thread to 1/3rd behind the hook’s eye. Wrap the delicate pheasant fibers forward to create the abdomen. Secure and tie off.

Step 6: Rib The Abdomen
Wrap the ribbing in the opposite direction than the pheasant fibers. Create a neatly spaced segmented body using this technique so that your fly ribbing looks like that of the fly in the photo of the next step.
Once you reach the end of the abdomen, secure the ribbing with thread and cut off the excess, being careful not to cut of your tying thread.

Step 7: Tie In The Wing Case
Select about 6 pheasant fibers from a feather. Place the part where you made the cut (the base of the fibers) on top of the hook shank where you ended the abdomen. With pinch wraps, secure them in place and cut off the excess.
Tidy up any material in the thorax portion. Now run your thread back to where you tied in the wing case.

Step 8: Dub The Thorax
Create a nice, tightly wound dubbing noodle around the thread. If you are having difficulty with this, moisten your fingertips slightly or make us of wax.
Dub the thorax forward, with touching turns. Ensure that you aren’t leaving any gaps to expose the underlying thread. End the thorax leaving a small gap behind the hook’s eye.

Step 9: Secure The Wing Case
Brush out some of the thorax fibers with a piece of Velcro. Fold the pheasant tail wing case over the thorax and tie in where you left the thread.
This should be just behind the eye of the hook. Ensure that the fibers are pulled tight up against the thorax. Cut off the excess fibers and tidy up the leftover material.

Step 10: Finish The Fly
Form a neat small head for the fly and whip finish. For added durability, add a drop of your preferred head cement. I am making use of fine UV resin. In that case, just zap the resin with a UV light.
If you do not have a UV light, you can place the fly in a sunny windowsill to set the glue. It should only take a few moments.

The Pheasant Tail Nymph
Now You Know How To Tie A Pheasant Tail Nymph
As soon as you are comfortable tying the PTN, get yourself some different hook sizes and various beads. Tie many different weight, material, and color combinations. It’s good to have a row or two in your fly box dedicated to the PTN.
I hope that you found this article insightful and that it inspired you to learn how to tie this simple, yet effective, fly.
Please leave any comments down below, I would love to hear from you.
Amazon and the Amazon logo are trademarks of Amazon.com, Inc, or its affiliates.
As a part of the Amazon Associates Program and other affiliate programs, Into Fly Fishing® may receive a comission if you order products through links on this website.


