As an Amazon Associate I earn from qualifying purchases.
The Turle knot is the one I reach for when I’m fishing traditional wet flies and Atlantic salmon patterns with turned-up or turned-down eyes. Every other knot I tie goes through the hook eye and cinches against it. This one forms a loop that seats around the hook’s neck, behind the eye, so the tippet runs straight off the shank. On a turned-eye hook, that difference matters.
It’s a knot with about 150 years behind it, and it still earns its place in my box. If you’re fishing classic soft hackles or any fly where the hook eye doesn’t point straight ahead, this is the connection that lets those flies track the way they were designed to.
I’ll show you the basic Turle first, then the Double Turle, which handles fluorocarbon better. Neither takes more than a minute once you’ve tied it a few times.
Quick Answer: Thread tippet through the hook eye, double the tag end back toward the fly and form a loop, pass the tag through that loop twice (double overhand), tighten, then slip the loop over the entire fly and pull the standing line to seat the knot on the hook neck behind the eye. Works best for turned-up and turned-down eye flies. For fluorocarbon, use the Double Turle: form two loops, tie a single overhand around both, and pass the hook through both loops.
What Is the Turle Knot?
The Turle knot is a tippet-to-fly connection that was popularized by Major William Greer Turle, a British angler in the 1800s who was an early advocate for eyed hooks in fly fishing. The name is sometimes spelled “Turtle knot”, but Turle is correct.
What makes it different from a clinch or improved clinch is where it seats. A clinch knot cinches directly against the hook eye, which means the tippet exits at whatever angle the eye points. On a turned-up or turned-down eye hook, that angle pulls the fly off-axis in the water.
The Turle fixes that. Instead of cinching against the eye, it forms a loop that goes over the entire hook and seats around the neck of the shank, just behind the eye. The tippet exits straight, in line with the shank, regardless of eye orientation. That’s the whole point of this knot.
For a full look at how this fits with other fly fishing connections, see our fly fishing knots guide.
When to Use the Turle Knot
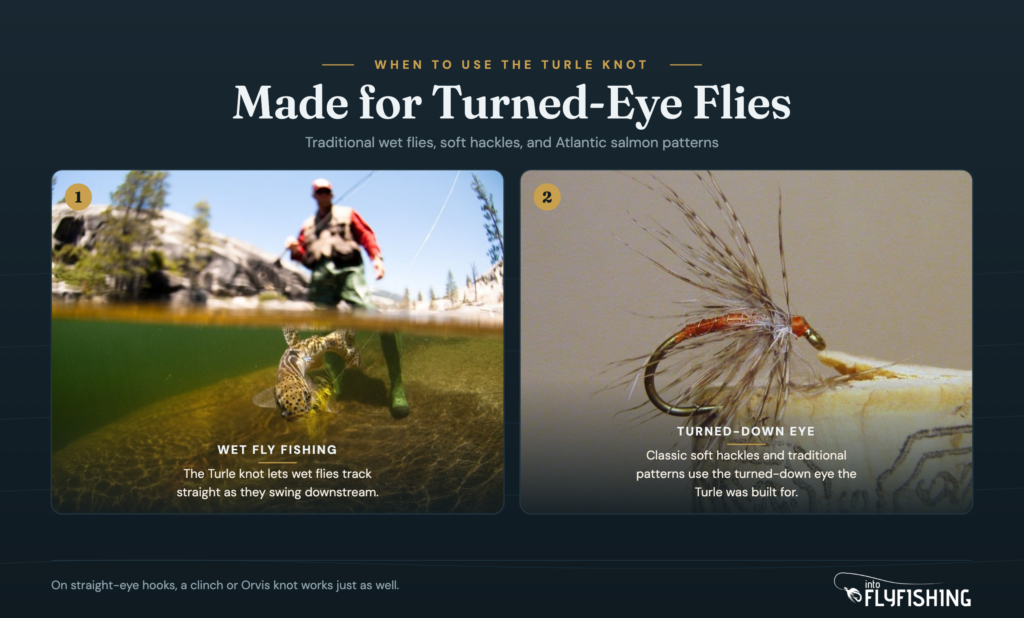
I use the Turle knot almost exclusively with flies that have turned-up or turned-down eyes: classic wet flies, traditional nymphs, and Atlantic salmon patterns. Those are the situations where the straight-exit matters and the Turle earns its place.
On straight-eye hooks, an Orvis knot or improved clinch already exits straight, so the Turle gives you no advantage there. Use the right knot for the hook.
A few specific scenarios where I tie this one:
- Traditional wet flies on turned-down eyes, where the fly needs to swing and track properly in the current
- Classic soft hackle patterns for steelhead or Atlantic salmon
- Any fly where the manufacturer designed the presentation around the hook eye angle
- Situations where I want to be able to remove the fly and reseat it without cutting the tippet
If you’re not sure about tippet selection for a given fly, that’s a separate question, but for standard trout wet fly fishing in 3X to 5X, this knot handles it fine.
What You’ll Need
Not much. The Turle knot requires the same gear as any tippet-to-fly connection:
- Tippet in the appropriate size for your fly and target species
- The fly you’re attaching
- Nippers to trim the tag end
- Saliva or water to lubricate before cinching
One note on tippet material: the basic Turle knot can slip on slippery fluorocarbon. If you’re fishing fluoro, use the Double Turle version instead. I cover that right after the main steps below. Nylon tippet is more forgiving and easier to learn the knot on.
If you’re still sorting out your fly line and leader setup, our best fly lines guide covers how to match your line to the situations you’re fishing, including the backing and leader lengths that go with them.
How to Tie the Turle Knot: Step-by-Step
Practice these steps a few times on a large hook at the kitchen table before you take it streamside. The motion becomes automatic after a dozen reps.
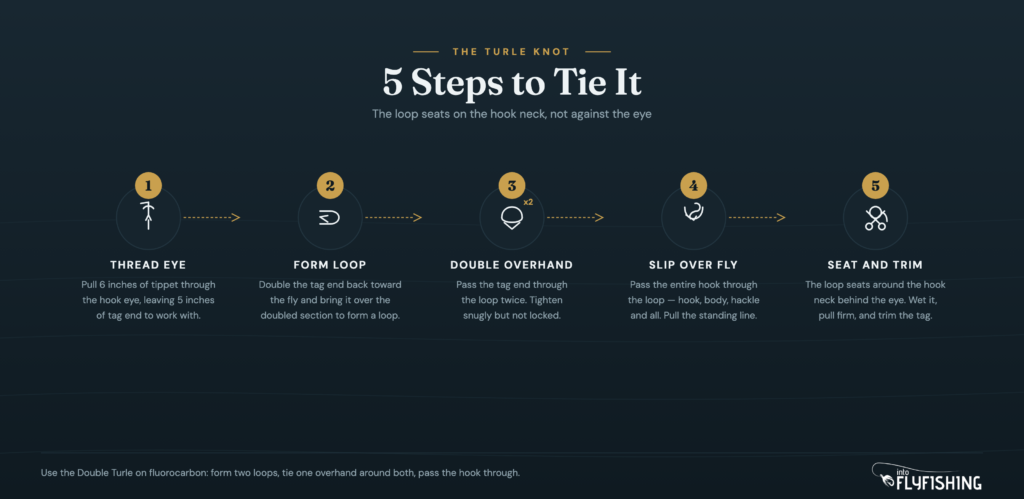
Step 1: Thread the Tippet Through the Hook Eye
Pull about 6 inches of tippet off your spool. Thread the tag end through the hook eye, going in from the front. Leave 5 to 6 inches of tag on the far side to work with.
Slide the fly up the standing line and out of your working area, so you have a clear 5-inch section of tag end to form the knot.
Step 2: Double Back the Tag End and Form a Loop
Take the tag end and double it back toward the fly, running it parallel to the standing line. Then bring the tag end behind the doubled section and pass it over the front, forming a loop. The doubled section runs through the middle of that loop.
Hold the loop loosely between your thumb and forefinger. Keep it open. You need to pass the tag through it twice in the next step.
Step 3: Tie a Double Overhand Knot
Pass the tag end through the loop you formed in Step 2. Pull it through once, then pass it through a second time. This is a double overhand knot around the standing line.
Tighten the double overhand down snugly but not fully cinched. You want it firm enough to hold its shape while you work the next step, but not locked in place.
Step 4: Slip the Loop Over the Fly
This is the step that defines the Turle knot. Take the large loop you have and pass the entire fly through it, hook bend, hackle, body, and all. The loop needs to go around the whole fly, not just the hook eye.
Once the fly is through the loop, pull the standing line slowly. The loop will slide down the tippet, travel through the hook eye from the front, and seat itself around the hook’s neck, behind the eye on the shank side.
Step 5: Seat the Knot and Trim
Wet the knot with saliva, then pull the standing line steadily until the loop snugs tight around the hook neck and the double overhand cinches against it. Give it a firm pull to confirm it’s seated.
Check that the tippet exits in line with the hook shank, not canted to one side. If it’s off-angle, the knot slipped or seated incorrectly. Cut it off and tie again.
Trim the tag end close.
How to Tie the Double Turle Knot
The Double Turle is what I use on fluorocarbon and any time I want extra security on a bigger fish. Instead of one loop around the hook neck, you seat two loops. The procedure is slightly different from the basic version.
- Pass the tippet through the hook eye and slide the fly well up the standing line.
- Form two large loops in the tag end.
- Tie a single overhand knot around both loops together.
- Pass the entire hook through both loops at the same time.
- Tuck the tag end under the two loops before you tighten.
- Wet the knot and pull the standing line to seat both loops against the hook neck. Trim.
The Double Turle was developed specifically because slippery modern lines can let the single Turle slip. If you’re fishing fluorocarbon, this is the version to use.
This video from RIO Products shows the full tying process with detail on tightening and the advantages of the knot:

Common Mistakes When Tying the Turle Knot
A few things that go wrong consistently when people first learn this knot:
Not passing the whole fly through the loop. The fly has to go all the way through, not just the hook eye. If you thread the eye through the loop instead of the whole hook, the knot seats incorrectly and won’t exit straight.
Seating the knot in front of the hook eye instead of behind it. The loop is supposed to seat on the hook neck, between the eye and the hook body. If it ends up on the front of the eye, something went wrong in Step 4. The tippet should exit from behind the eye, not from the eye itself.
Using the single version on fluorocarbon. It will slip under pressure. Use the Double Turle for fluoro.
Not wetting the knot before cinching. The friction will weaken the tippet if you dry-cinch it.
Turle Knot vs. Improved Clinch Knot
These two knots connect tippet to a fly, but they aren’t interchangeable.
The improved clinch is the most common tippet-to-fly knot in fly fishing. It wraps the tag end around the standing line several times, then threads back through two openings to lock. It cinches directly against the hook eye, which means the tippet angle follows the eye angle. On a straight-eye hook, that’s perfectly in line with the shank. On a turned-up or turned-down eye, the tippet exits at an angle and can pull the fly slightly off-axis in the water.
The Turle’s loop goes around the hook neck behind the eye, so the tippet always exits in line with the shank regardless of eye orientation. That’s the structural difference.
For most modern trout flies on straight-eye hooks, the improved clinch is faster and works well. The Turle is the right choice when the hook eye isn’t pointing straight and proper fly presentation matters. If you’re fishing wet flies, classic soft hackles, or salmon patterns, the Turle is the one to know.
Two other options worth knowing: the Palomar knot for heavier terminal connections, and the Rapala knot if you want a loop-style connection that gives the fly free movement.
| Feature | Turle Knot | Improved Clinch Knot |
|---|---|---|
| Where it seats | Around hook neck behind eye | Against hook eye directly |
| Tippet exit angle | In line with hook shank | Follows hook eye angle |
| Best for | Turned-up / turned-down eye flies | Straight-eye hooks |
| Fluorocarbon | Use Double Turle version | Works well |
| Speed | Moderate | Fast once practiced |
| Removable without cutting | Yes (loosen and slip off) | No |
FAQ
Thread tippet through the hook eye, double the tag end back toward the fly, and bring the tag behind and over the doubled section to form a loop. Pass the tag through that loop twice (double overhand). Tighten the double overhand, then slip the entire fly through the large loop. Pull the standing line to seat the loop around the hook neck, wet it, cinch, and trim.
The single Turle forms one loop around the hook neck, secured by a double overhand knot. The Double Turle forms two loops, secured by a single overhand tied around both together. The Double Turle grips better on slippery modern lines and fluorocarbon. Use the Double Turle for fluoro; the single works fine on nylon.
It is best for flies with turned-up or turned-down eyes. Those include traditional wet flies, classic soft hackles, and Atlantic salmon patterns. On these hook styles, the Turle lets the tippet exit straight in line with the shank rather than at the angle of the eye. On straight-eye hooks, a clinch or Orvis knot works just as well with less complexity.
Yes, when tied correctly. The Double Turle in particular seats two loops around the hook neck, which holds well under pressure. The single Turle can slip on fluorocarbon under a hard run, so use the Double Turle version for any situation where you are targeting bigger fish on fluoro.
Where the Turle Knot Fits in Your Setup
The Turle knot solves one specific problem: getting turned-eye flies to track correctly. It’s not a general-purpose tippet-to-fly knot, and it doesn’t need to be. Keep it in your toolkit for wet flies and salmon patterns, and use a faster clinch-style knot for everything else.
Your tippet connects to the leader, which connects to the fly line. The Turle handles the last link in that chain. For the connections higher up, the surgeon’s knot is the go-to for tippet-to-leader, and our full knot library covers everything else you’ll need.
Amazon and the Amazon logo are trademarks of Amazon.com, Inc, or its affiliates.
As a part of the Amazon Associates Program and other affiliate programs, Into Fly Fishing® may receive a comission if you order products through links on this website.