As an Amazon Associate I earn from qualifying purchases.
Quick Answer: The Rapala knot is a non-slip loop knot tied in 8 steps: form a loose overhand knot in the line, thread the tag end through the lure eye, pass back through the overhand knot, make 3 wraps around the standing line, pass through the overhand knot a second time, thread through the new loop just formed, wet, and tighten. The finished knot stays open and lets the lure or fly swing freely.
I started using the Rapala knot for articulated streamers after noticing how much more action they had compared to a clinch-knotted connection. The overhand anchor is the whole trick: it keeps the loop from collapsing, so the lure can pivot at the eye instead of being pinned against it.
It takes about 30 seconds once you’ve tied it a handful of times. The sequence has eight steps, and two of them involve threading back through the same overhand knot, which is the part most people get tangled up on the first few tries. Work through it on the bench a few times before you’re streamside, and it becomes automatic.
This guide covers every step, where the knot makes sense and where it doesn’t, and the mistakes that cause it to fail.
What Is the Rapala Knot?
The Rapala knot is a non-slip loop knot designed for attaching a lure or fly directly to the line. Unlike an improved clinch or a Palomar, which both cinch against the hook eye under load, the Rapala forms a permanent open loop at the connection point. The lure or fly hangs through that loop rather than being locked in place.
The overhand knot tied in the first step is the structural key. It acts as a fixed anchor above the eye, and the tag end has to pass through it twice during the tying sequence. Those two passes, plus the three wraps around the standing line, create a locking arrangement that keeps the loop from collapsing even when the connection is under tension.
The knot is designed for monofilament. It works on fluorocarbon, but the stiffer material makes the wraps harder to seat cleanly. Braid isn’t a good fit because the wraps tend to slip on slick fibers.
Our fly fishing knots guide covers every connection in the full leader-to-fly chain. The Rapala handles one specific part of that system: terminal connections where lure action matters.
How to Tie the Rapala Knot: Step-by-Step
Leave yourself about 10 inches of tag end before you start. You’ll use more material than you expect during the wrapping sequence.
- Tie a loose overhand knot. About 8 to 10 inches from the end of the line, form a simple overhand knot. Leave it loose enough that a pencil could pass through the loop. This overhand knot is the anchor that holds everything together, so don’t skip the looseness.
- Thread the tag end through the lure eye. Pass the tag end through the eye of your fly, lure, or hook from front to back. Pull enough through that you have 4 to 5 inches to work with beyond the eye.
- Pass back through the overhand knot. Bring the tag end back toward the overhand knot and thread it through, entering from the same side the standing line exits. You’ll end up with the tag end heading back toward the lure.
- Make 3 wraps around the standing line. Wind the tag end around the standing line exactly 3 times, working toward the lure. Keep the wraps neat and close together.
- Pass back through the overhand knot a second time. Thread the tag end through the overhand knot again, entering from the same side as Step 3. This is the step most people miss. Both passes through the overhand knot go from the same direction.
- Thread through the new loop. As you pulled the tag end through the overhand knot in Step 5, a small loop formed just above the knot. Pass the tag end through that loop.
- Wet the knot. Wet it before pulling anything tight. Friction heat from a dry cinch weakens monofilament at the knot.
- Tighten in two stages. First, pull the standing line while holding the tag end to seat the wraps. Then pull both the standing line and tag end together to close the knot fully. The finished connection should have a small open loop at the lure eye, not a loop closed against it.
- Trim the tag end. Leave 1 to 2 millimeters. Flush-trimming can let the end work back through under repeated casts.
Check the loop before you cast. If it collapsed against the eye during tightening, the overhand knot was too tight in Step 1. Cut it off and start over with a looser overhand.
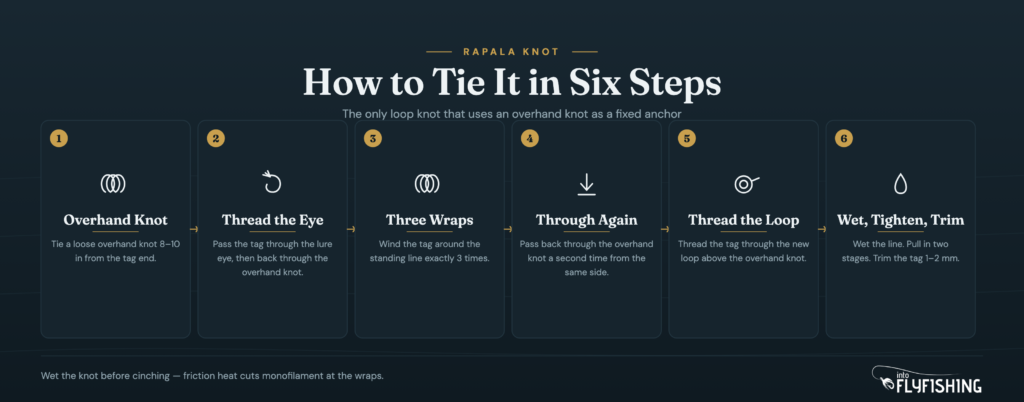
The diagram below shows the six key moments in the sequence. Steps 3 and 5 are the ones most people get wrong on the first try. Both pass through the overhand knot from the same side, but the second pass is easy to miss.
When to Use the Rapala Knot
The Rapala knot is the right call any time lure or fly action depends on a pivot point at the eye. Here’s where I reach for it:
- Articulated streamers. A pinned connection damps the rear hook’s movement. The open loop lets both sections of the fly work independently.
- Wobblers and suspending minnow baits. This is what the knot was originally designed for. The lure swings and darts rather than being anchored rigid.
- Surface lures and poppers. Poppers generate side-to-side action that translates better through a loop than a tight clinch.
- Salmon flies and large saltwater patterns. Rapala’s own knot guide lists salmon flies specifically. The open loop gives big, heavy flies the swimming movement that triggers strikes.
Avoid the Rapala knot on very light tippet. Managing a loose overhand knot and three wraps on 5X or 6X fluorocarbon is more trouble than the lure action is worth on a dry fly. For nymphs and dry flies, a Davy knot or Orvis knot is faster and strong enough for anything you’ll encounter.
For braid, the Rapala isn’t ideal either. The wraps don’t bite into slick braided fibers the way they do on mono. A uni knot or Palomar is more reliable on the braided backing end of your system.

If you’re dialing in the full system from reel to fly tip, our best fly lines guide covers fly line and backing combinations that make sense for different freshwater and saltwater setups. The Rapala handles one connection in that chain well; the rest of the chain still needs attention.
Rapala Knot vs. Perfection Loop vs. Palomar
Three of the most common knots that form a loop at the end of a line, but they do different jobs.
| Knot | Loop stays open? | Best use | Line type | Difficulty |
|---|---|---|---|---|
| Rapala knot | Yes | Terminal: lures, action flies | Monofilament | Moderate |
| Palomar knot | No (cinches to eye) | Terminal: braid, heavy tackle | Mono / Fluoro / Braid | Easy |
| Perfection loop | Yes (collapses under load) | Leader-to-leader (not terminal) | Mono leader | Moderate |
The perfection loop is a leader knot, not a terminal knot. You tie it at the butt end of a leader to create a loop-to-loop connection with your fly line. It’s not designed to attach directly to a hook or lure, and under heavy lateral load it can cut into itself on fluorocarbon. The Rapala is the one that attaches directly to the lure eye.
The Palomar knot is a strong terminal knot at 95 to near-100 percent of rated line strength, but it tightens against the hook eye. The lure or hook is locked in place rather than free to swing. For heavy-duty applications on braid, the Palomar is a better choice than the Rapala. For flies and lures where swimming action is the point, the Rapala is the one.
Common Rapala Knot Mistakes (and How to Fix Them)
These are the errors I see most often, and the ones I made myself when I first learned this knot:
- Overhand knot tied too tight in Step 1. If the overhand is snug before you start threading, you can’t get the tag end through it twice, and the final loop often collapses against the eye. The overhand should be loose enough to pass a hook through before you start threading.
- Tag end enters the overhand knot from the wrong side. Both passes through the overhand knot in Steps 3 and 5 go from the same side. Reversing direction on the second pass creates a different, weaker geometry. If the knot looks lopsided after tightening, this is usually why.
- Wrong wrap count. The knot calls for exactly 3 wraps. Two is too few to lock the overhand in place; four creates a bulky knot that seats poorly. Count them as you go.
- Skipping the wet step. Dry monofilament cinches with enough heat to cut into itself at the wraps. Always wet before pulling tight.
- Loop collapses during tightening. If the loop closes against the eye, the knot isn’t doing its job. The two-stage tightening in Step 8 is what keeps the loop open. Pull the standing line first to seat the wraps, then finish with both ends. Pulling only the tag end to tighten can collapse the loop.
FAQ
Not exactly. The non-slip loop knot (sometimes called Lefty’s Loop or the Kreh loop) uses a figure-eight as its foundation rather than a simple overhand knot, and the wrapping sequence differs. Both create open loops at the terminal end and serve the same purpose. The Rapala knot uses an overhand knot as the anchor; the non-slip loop uses a figure-eight. Either works for giving lures free movement at the eye.
Yes. Fluorocarbon is stiffer than monofilament, which makes the wraps harder to seat neatly, but the knot holds. Wet it thoroughly before pulling tight, and use two stages of tightening to avoid the wraps bunching unevenly. On very light fluorocarbon, 5X and finer, the process is difficult enough that an Orvis knot or Davy knot is usually a better choice.
Three wraps around the standing line. Both AnimatedKnots and NetKnots specify exactly three. Two wraps don’t lock the overhand anchor securely enough; four create a bulky knot that seats poorly at the eye. Three is the number.
Use the Rapala when lure or fly action depends on a pivot point. The Rapala forms a non-slip loop that lets the lure swing freely; the Palomar cinches against the eye and pins it. For articulated streamers, poppers, or any wobbling lure where action comes from the lure moving independently of the line, the Rapala is the right call. For applications where you want a locked terminal connection and maximum strength on braid, the Palomar is better.
Get the Full System Right
The Rapala knot handles one end of the equation. It’s the connection between your line and the fly or lure, and it does that job well when the application calls for a free-swinging loop.
The rest of the system matters just as much. Fly line weight, backing capacity, leader taper, and tippet diameter all affect how much load ever reaches your terminal knot. A mismatched system puts stress on every connection including the best Rapala knot you can tie.
Our fly fishing knots guide covers every other connection in the chain from reel to fly. The Rapala is one piece of it.
Amazon and the Amazon logo are trademarks of Amazon.com, Inc, or its affiliates.
As a part of the Amazon Associates Program and other affiliate programs, Into Fly Fishing® may receive a comission if you order products through links on this website.