As an Amazon Associate I earn from qualifying purchases.
Quick answer: Tie an arbor knot to attach dacron backing to your reel’s spool: loop the backing around the arbor, tie an overhand knot with the tag end around the standing line, then tie a second overhand stopper knot close to the first, pull both together, and cinch them down onto the arbor. Once the backing is secured, spool it on under light, steady tension until you have 1/8 to 1/4 inch of clearance from the rim when the fly line is also loaded.
The first time I loaded a fly reel by myself, I jammed it so full the fly line started catching on the frame mid-cast. The fix took about five minutes once I knew what I was doing. Backing sounds like a small detail, but getting it wrong costs you fish.
This guide walks through attaching backing to a fly reel step by step, including the arbor knot, how to figure out the right fill level, and how to connect your backing to the fly line once it’s on.
What Is Fly Reel Backing and Why You Need It
Fly reel backing is braided line that sits between the bare arbor and your fly line. It fills out the spool so your fly line sits near the rim, which means every turn of the handle retrieves more line. That matters when you need to get a fish back fast.
It also gives you reserve line. Most trout runs don’t pull past the fly line, but a strong fish can strip every inch of a fly line and keep going. The backing is what saves you from a break-off in that case. Saltwater anglers and steelhead fishers depend on it constantly; freshwater trout anglers just need it less often.

For most freshwater rigs, 20 lb braided dacron is standard. If you are targeting larger fish, 30 lb is fine and takes up only a little more space. You can read more about the terminology around fly line setup in our fly fishing terms glossary.
What You Need Before You Start
You do not need any special tools. A small card table, your reel, the backing spool, your fly line box, and a pair of scissors covers it.
The one thing that actually helps is a way to feed the backing and fly line off their spools without tangling. A helper holding the spool works, or run the spool through a loose loop of something stable (a dowel through a dresser handle, or the back of a chair). You need the spool to spin freely as you reel.
Make sure you know which end of your fly line goes onto the reel first. Most modern fly lines have a sticker that reads “this end to the reel” or similar. That end goes in first. If yours has two colors, the reel end is the thinner, less tapered color.
- 20 lb or 30 lb braided dacron backing
- Your fly reel and spool
- Fly line (note which end goes on the reel first)
- Sharp scissors
- A helper or improvised holder for the line spool
- Tape (optional, to hold the line end temporarily)
How Much Backing to Put on a Fly Reel
Manufacturers print estimated yardage on reel specs, but those numbers vary by line weight and brand. The more reliable method is to measure using the reel itself, and load everything in reverse.
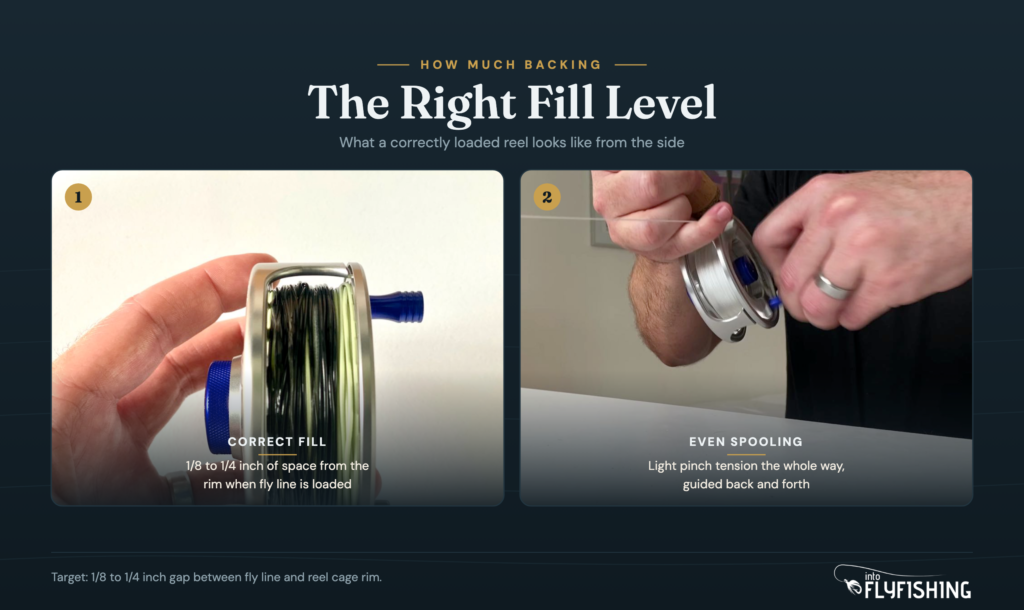
Start by feeding the fly line onto the reel first, reel-end sticker side in. Tape the end to the spool temporarily or just let it sit. Reel the whole fly line on. Then start reeling the backing over the fly line until you reach a fill level of about 1/8 to 1/4 inch from the outer rim of the reel cage. That gap keeps the line free to spin without catching the frame.
Mark that point, strip everything back off, and now you have the exact length of backing this reel needs. Re-spool in the correct order: backing on first, fly line over it. A bit more work upfront, but you will not have to redo it later.
How to Attach Backing to the Arbor (The Arbor Knot)
The arbor is the center drum of the reel spool. The arbor knot is built for this one job: it cinches down on the arbor and does not slip, even with nothing holding it in place until the line piles on top.
Step-by-Step Arbor Knot Instructions
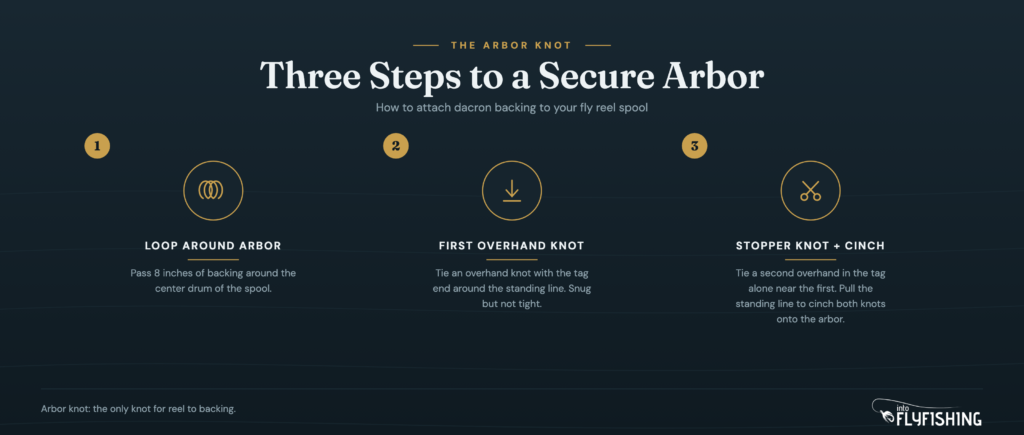
- Pass about 8 inches of backing around the arbor.
- With the tag end, tie a simple overhand knot around the main standing line. Snug it up but do not tighten it all the way yet.
- Tie a second overhand knot in the tag end alone, close to the first knot. Pull this tight. This is the stopper knot that keeps the first from slipping.
- Pull the standing line so both knots slide together and cinch down flat against the arbor. Trim the tag end short.
The arbor knot uses two stacked overhand knots: the first secures the standing line, the second acts as a stopper so the first cannot pull through. Skip that stopper knot and the whole assembly can slip free under load. For more knot breakdowns, see our guide to fly fishing knots.
How to Spool Backing onto the Reel
Once the backing is tied to the arbor, start reeling. Keep light, steady tension on the line the whole time by pinching it between your thumb and forefinger on the way to the spool. If you let it go slack and just reel fast, the backing lays unevenly and can cut into itself when a fish runs.
Guide the line back and forth across the spool as you reel, the same way you would guide a fish in. You are aiming for even, flat wraps from one side of the spool to the other.
Stop when you reach your measured fill level. If you skip the reverse-load step and are going by feel, stop when there is about 1/4 inch of space between the backing and the rim of the reel cage.
How to Connect Backing to Fly Line
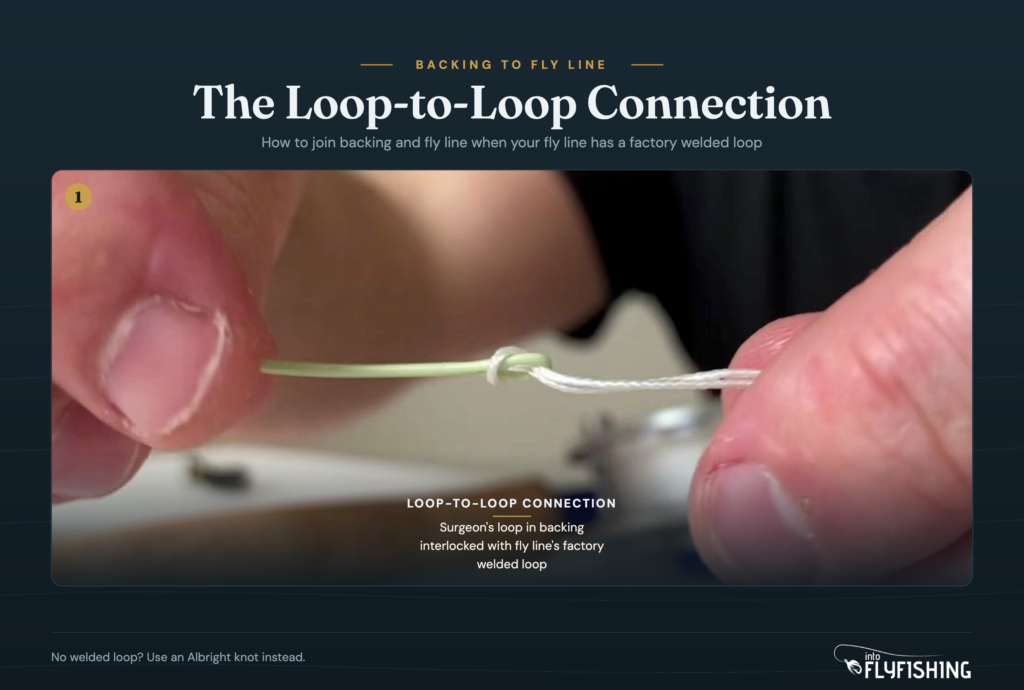
The loop-to-loop connection requires a factory-welded loop on your fly line. Most modern lines come with one; budget or older lines sometimes do not.
Tie a double or triple surgeon’s loop in the tag end of your backing (see our triple surgeon’s knot guide if you need the steps). Pass the backing loop through the welded loop on your fly line. Then pass the entire fly line spool back through the backing loop. Pull everything until the two loops interlock, and tighten the connection by pulling the fly line and backing away from each other.
If your fly line does not have a welded loop, you can tie an Albright knot instead. It takes more time but holds just as well.
The quality of your fly line matters here. A well-made line with a consistent factory loop makes the connection cleaner and sits better on the reel. If you are putting together a new setup, check our roundup of the best fly lines before you buy.
Once the fly line is attached, reel it on with the same steady pressure you used for the backing. After that, you can attach your leader using a loop-to-loop connection at the front end of the fly line. We cover that process in how to attach a leader to fly line.
Common Mistakes When Loading Backing
Overfilling is the most common problem. If the fly line rides right at the rim or above it, it catches on the frame when you retrieve. Leave that 1/8 to 1/4 inch gap.
Spooling under no tension is the second mistake. Loose wraps dig in under load, which can cause the line to bunch and stick when a fish pulls fast. Always pinch the line as you reel.

Skipping the stopper knot on the arbor knot is another one. The first overhand knot alone can work free if the backing ever goes slack on the reel. That second knot takes five seconds and removes the risk.
Finally, check your reel direction before you load anything. Set the drag to maximum, then reel in the way you retrieve. If you feel no drag, the direction is correct. If the drag catches when you reel in, you need to flip the mechanism. Loading a reel running the wrong direction means unloading the whole thing.
Frequently Asked Questions
For most freshwater trout fishing, you can skip backing and fill with fly line. But most reels are designed with extra spool depth, so a fly line alone leaves a lot of empty arbor, which slows your retrieve. Backing fills that space and gives you reserve line if a big fish runs past the end of your fly line. It is worth the ten minutes to do it right.
Yes. Standard fly fishing backing is already braided dacron, which is a form of braided line. Gel-spun polyethylene (GSP) braids like Spectra or PowerPro also work and are thinner at the same strength. For most anglers on a standard trout or bass setup, 20 lb dacron is more than enough. GSP is mainly worth it if you need extra capacity on a small reel for big fish.
Tight enough that it lays flat and even, not so tight that you are straining against the spool. The right feel is moderate pinch pressure between your thumb and forefinger as you reel. If it is so loose the wraps shift when you press on them with a finger, re-spool with a bit more tension.
It depends on your reel. Use the reverse-load method described above to find the exact amount your reel takes. As a rough guide, a 5-weight trout reel usually holds 50 to 100 yards of 20 lb dacron behind the fly line. Larger reels for 8-weight and above may hold 150 to 250 yards. The reel’s spec sheet will list a capacity figure, but those are estimates.
Tie the backing to the arbor with an arbor knot, spool it on to the correct fill level, connect the fly line to the backing with a loop-to-loop connection, reel on the fly line, and then attach your leader to the front loop on the fly line. Our printable fly fishing knots cheat sheet covers the key knots for each connection.
Amazon and the Amazon logo are trademarks of Amazon.com, Inc, or its affiliates.
As a part of the Amazon Associates Program and other affiliate programs, Into Fly Fishing® may receive a comission if you order products through links on this website.